site top | diary | column | tips | gallery

2008年10月 アーカイブ

SeleniumRCをFirefox3で動かす

SeleniumRCをFirefox3で動かそうとすると、そのままでは上手くいかないので、以下のサイトを参考に試行錯誤した結果、以下の手順で動作させることができた。

参考サイトOpenQA

手順
1.Firefoxをコマンドプロンプトから、以下の引数をつけてfirefoを起動させるとプロファイルマネージャーが起動する(注:このときfirefoxは全て閉じておくこと)
C:\Program Files\Mozilla Firefox -profilemanager

2.新しいプロファイルを作成。適当にSeleniumとか名前をつける

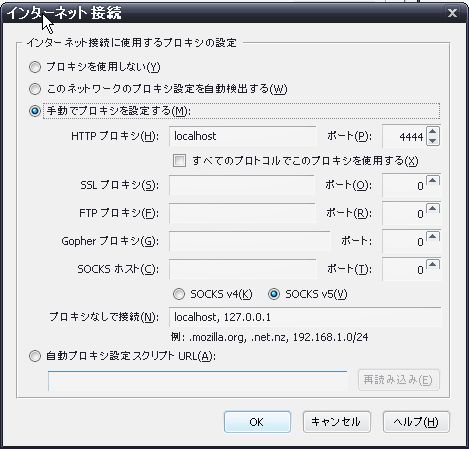
3.proxyの設定を行う。ツール>オプション>詳細>ネットワーク> にproxyの設定画面へ行くボタンがある。proxyは以下の通り設定する。

手動でプロキシを設定する
HTTPプロキシ localhost ポート:4444
Winshot_001.JPG


4.Seleniumを起動させる前に以下のコマンドをコマンドプロンプトで実行。
set BROWSER="*custom C:\Program Files\Mozilla Firefox\firefox.exe"

見本のバッチファイルとして動かす場合のサンプルを以下に示す


rem ***** アドレス(IP又はドメイン)とポートを指定する *****
set PROXY_OPTION=-Dhttp.proxyHost=localhost -Dhttp.proxyPort=4444

@rem 下記を環境に合わせて変更してください。
set JAVA_HOME=C:\jdk1.5.0_14

@rem set up PATH
set PATH=%JAVA_HOME%\bin

rem ***** selenium-serverディレクトリを指定する ******
set SELSERV_DIR=%CD%

rem ***** ブラウザを指定 *****
#set BROWSER="*iexplore"
#set BROWSER="*firefox"
set BROWSER="*custom C:\Program Files\Mozilla Firefox\firefox.exe"

rem ***** テスト対象のドメイン(ベースURL) *****
set TESTDOMAIN="http://www.google.co.jp"

rem ***** TestSuiteファイルを指定する *****
set TESTSUITE=%SELSERV_DIR%\suite.html

rem ***** 結果出力ファイルを指定する *****
set RESULTFILE=%SELSERV_DIR%\TestResult.html

rem ***** タイムアウト時間を設定する *****
set TIMEOUT="60000"

rem ***** Firefoxのプロファイルを設定する *****
set PROFILE="C:\selenium-server\firefox3/"

rem *****テストを実行する********************
cd %SELSERV_DIR%

java %PROXY_OPTION% -jar selenium-server.jar -htmlSuite %BROWSER% %TESTDOMAIN% %TESTSUITE% %RESULTFILE% -timeout %TIMEOUT% -multiWindow

5.プロファイル選択画面が立ち上がると思うので、先ほど作成したSelenium用のプロファイルを選択

SeleniumのWeblogicへのデプロイ方法

基本はこのサイト「Selenium Core Installation on Weblogic in 9 Steps」にあるとおりだが、一部足らないので補足する


○Selenium Core Installation on Weblogic in 9 Steps

Selenium core Installation Instructions for deploying on the weblogic server 9.1:

1. Extract the selenium-core-0.8.3.zip into a custom folder say selenium-core any where outside the server. This will be the source of the deployable unit on the Administration Server
・SeleniumCoreのzipをダウンロードしたら、それをWeblogicServerの外で解凍する。

2. In this custom folder add WEB-INF folder structure:
・SeleniumCoreのフォルダの下にWEB-INF以下のフォルダを追加する。サブフォルダの中身は空でよい。
・WEB-INF
・Under this WEB-INF directory, create the following:
src (empty folder)
classes (empty folder)
lib (empty folder)
web.xml ← In this file add the content
・またweb.xmlという名前のファイルを作り、中には「

<web-app> </web-app>」とだけ書いておく。
Weblogic.xml
・さらにWeblogic.xmlというファイルを作成し、以下の内容を記述する。
<?xml version="1.0"?>
<!DOCTYPE weblogic-web-app
PUBLIC "-//BEA Systems, Inc.//DTD Web Application
8.1//EN" "http://www.bea.com/servers/wls810/dtd/weblogic810-web-jar.dtd">
<weblogic-web-app>
<context-root>selenium</context-root>
</weblogic-web-app>

3.Start the weblogic from the domain where your application is deployed.
・Weblogicを起動させる

4.Create domain say selenium NOTE: This is outside selenium-core directory and also the server.
For this

cd $BEA_HOME
Create the domain using config.sh which is under $BEA_HOME/ weblogic91/common/bin (which is same as WL_HOME/common/bin).
NOTE: Default values can be replaced
・これは必要ない。あらたにドメインを作成するのではなく、以下の方法でSeleniumをデプロイする。


5.Start the weblogic server from /bin. In this case, selenium/bin

・これも必要ない。すでにWeblogicは起動している。

6.open console and goto deployments and deploy the total selenium core folder (open deployment)
・コンソールを開き、デプロイメントを選択。その後で、「ロックして編集」を押下するとインストール作業が行えるようになる。
・Selenium-Coreフォルダを選択し、インストールし、起動させる。
l・ocalhost:port番号/selenium/にアクセスできれば起動は成功。

2009年10月
        1 2 3
4 5 6 7 8 9 10
11 12 13 14 15 16 17
18 19 20 21 22 23 24
25 26 27 28 29 30 31

Recent TrackBack

you16.com 2007 all right reserved